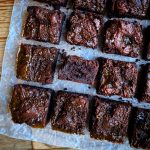
Salted Caramel Brownies
Imagine the fudgiest chocolate brownies, studded with bits of salted caramel. Now imagine even more caramel placed on top. Then bake. Yum!
Servings: 16 pieces
Ingredients
Salted Caramel
- ½ cup granulated sugar
- 3 tablespoon unsalted butter
- ¼ cup heavy cream
- ½ teaspoon flaky sea salt (or ¼ teaspoon if using table salt)
And Let’s Not Forget the Brownies!
- 1 stick unsalted butter
- 3 oz bittersweet chocolate, coarsely chopped (70% is my preference, but at least 60% to avoid too much sweetness)
- 1 teaspoon espresso powder or instant coffee crystals
- ¾ cup all-purpose flour
- ¾ cup dark cocoa powder (it should say “dutched” somewhere on the label)
- ½ teaspoon baking powder
- ½ teaspoon fine grain salt
- 3 large eggs, at room temperature
- ¾ cup granulated sugar
- ¼ cup brown sugar (light or dark)
- A sprinkle of flaky sea salt for the top (optional, but hey...)
Instructions
Salted Caramel
- Place the sugar in a small saucepan over medium high heat. Stir frequently – the sugar will form clumps at first, but will melt into a thick amber colored liquid. Watch it carefully, as it will go from perfect to ruined really fast. I’d rather you make a lighter color than burn it.
- Remove from heat. Add butter and stir in until melted. Add cream and stir in. Be careful! It will bubble and spit, but don’t worry, that’s just what caramel does. Return to heat – let it bubble for another two minutes. Stir in your salt. Pour the caramel onto a parchment paper lined plate or bowl. Freeze for 20-30 minutes to solidify. When ready, spray a sharp knife with non-stick spray and cut the caramel into small pieces. Place back in the freezer until ready to add to the brownie batter. Don’t eat it.
Don’t Forget the Brownies!
- Preheat oven to 350°. Spray an 8x8” baking pan with non-stick spray and line with parchment paper, allowing some to hang over the sides to act as handles for lifting the brownies out at the end. I highly recommend that you don’t skip this step because there will be melty pools of caramel trying to keep your brownies in the pan! Melt butter in a small saucepan. Add chocolate and espresso to the melted butter and stir until melted and well mixed. Allow to cool.
- Sift flour, salt, baking powder, and cocoa powder together. Set aside.
- Combine eggs and sugars in stand mixer and, using the whisk attachment, whip together for about 3-4 minutes until the mixture thickens and lightens in color. Using really well whipped eggs like this helps to give the brownies their traditional “crackly paper” top. I love that part 😍
- Drizzle the cooled chocolate mixture into the eggs and sugar and combine until completely incorporated. Remove the bowl from the mixer and, using a silicone or rubber spatula, fold the flour mixture in by hand just until the last bits of flour have completely mixed in. I prefer to do this part by hand so that I don’t overmix the batter.
- Go get your (uneaten) caramels out of the freezer and fold about ⅔ of the pieces into the batter. Pour the batter into your prepared 8X8 pan. Press the rest of the caramels into the top of the batter. Sprinkle a bit of flaky sea salt on top to tell everyone what you’re about.
- Bake in 350° oven for 30-35 minutes, turning the pan around half way through. I start checking at 25 minutes so I don’t over bake cuz no one wants a dry brownie. How do you know when a brownie is done? Tricky question, since a toothpick inserted in the center will always come out with some chocolate on it, not to mention melty caramel, but this is my take: When they are done, the edges of the brownies will be definitely set and the center will have no jiggle. You may also start to see some of the crackling of the top, usually near the edges as well. (They’ll finish their crackle as they cool and as you cut them.) Best bet? Take them out as soon as you see these signs since they’ll continue cooking in the pan for a few minutes. Please, oh please, allow these to cool for just a little bit. Can you wait about 10-15 minutes? This will allow the caramel to go just a bit below the temperature of molten lava and allow you to eat one without melting your face off. Safety first.
